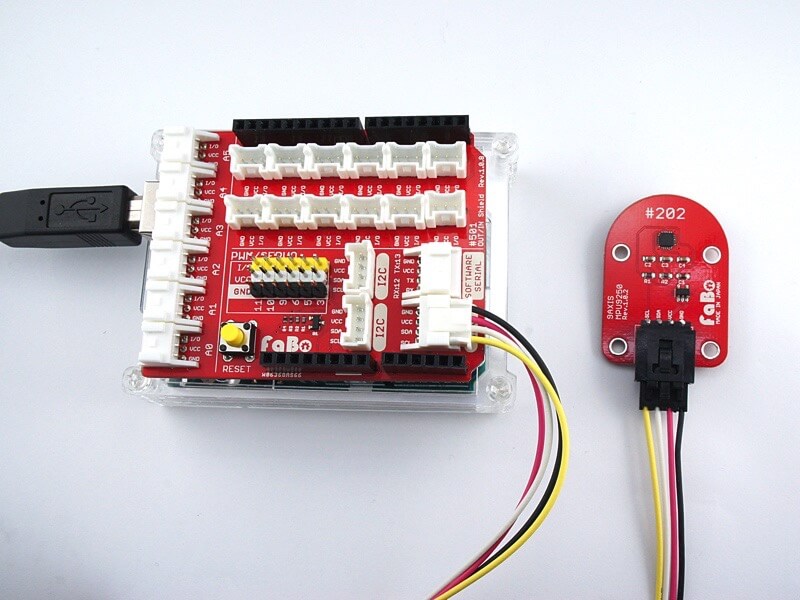
#202 9Axis I2C Brick

Overview
1チップで3軸加速度、3軸ジャイロ、3軸コンパスを取得できるセンサを使用したBrickです。
I2Cでデータを取得できます。
Connecting
I2Cコネクタへ接続します。

Support
| Arduino | RaspberryPI |
|---|---|
| ◯ | ◯ |
MPU-9250 Datasheet
| Document |
|---|
| MPU-9250 Register Map |
| MPU-9250 Datasheet |
Register
MPU-9250は、三軸加速度、ジャイロ用とコンパス用の2つのI2C Slave Addressがあります。
MPU-9250(三軸加速度、ジャイロ)
| Slave Address |
|---|
| 0x68 |
AK8963(コンパス)
| Slave Address |
|---|
| 0x0C |
Schematic

Library
for Arduino
-
ライブラリ名:「FaBo 202 9Axis MPU9250」
- Library Document
for RapberryPI
- pipからインストール
pip install FaBo9Axis_MPU9250 - Library GitHub
- Library Document
Sample Code
for Arduino
I2Cコネクタに接続した9Axis I2C Brickより3軸加速度、3軸ジャイロ、3軸コンパス情報を取得し、シリアルモニタに出力します。
//
// FaBo Brick Sample
//
// #202 9AXIS I2C Brick
//

#include <Wire.h>

#define ADDR_MPU9250 (0x68) // 3軸加速度、ジャイロ
#define ADDR_AK8963 (0x0C)  // コンパス

void setup()
{
  Serial.begin(9600); // シリアルの開始デバック用
  Wire.begin();       // I2Cの開始

  byte who_am_i = 0x00;

  // デバイスチェック
  Serial.println("Checking I2C device...");
  readI2c(ADDR_MPU9250, 0x75, 1, &who_am_i);
  if(who_am_i == 0x71){
    Serial.println("I am MPU9250");
  }else{
    Serial.println("Not detected");
  }

  // コンパス有効化
  writeI2c(ADDR_MPU9250,0x6B,0x00);
  writeI2c(ADDR_MPU9250,0x37,0x02);
}

void loop()
{
  // 3軸加速度
  int length = 6;
  byte axis_buff[6];
  readI2c(ADDR_MPU9250,0x3B, length, axis_buff);
  int ax = axis_buff[0] << 8 | axis_buff[1];
  int ay = axis_buff[2] << 8 | axis_buff[3];
  int az = axis_buff[4] << 8 | axis_buff[5];

  // 3軸加速度出力
  Serial.print("ax: ");
  Serial.print( ax );
  Serial.print(" ay: ");
  Serial.print( ay );
  Serial.print(" az: ");
  Serial.println( az );

  // ジャイロ
  byte gyro_buff[6];
  readI2c(ADDR_MPU9250,0x43, length, gyro_buff);
  int gx = gyro_buff[0] << 8 | gyro_buff[1];
  int gy = gyro_buff[2] << 8 | gyro_buff[3];
  int gz = gyro_buff[4] << 8 | gyro_buff[5];

  // ジャイロ出力
  Serial.print("gx: ");
  Serial.print( gx );
  Serial.print(" gy: ");
  Serial.print( gy );
  Serial.print(" gz: ");
  Serial.println( gz );

  // コンパス
  byte magn_buff[7];
  int mag_length = 7;
  readI2c(ADDR_AK8963,0x03, mag_length, magn_buff);
  int mx = magn_buff[0] << 8 | magn_buff[1];
  int my = magn_buff[2] << 8 | magn_buff[3];
  int mz = magn_buff[4] << 8 | magn_buff[5];

  // コンパス取得用の設定(更新用)
  writeI2c(ADDR_AK8963,0x0A,0x01);

  // コンパス出力
  Serial.print("mx: ");
  Serial.print( mx );
  Serial.print(" my: ");
  Serial.print( my );
  Serial.print(" mz: ");
  Serial.println( mz );
  Serial.println( "" );

  delay(1000);
}

// I2Cへの書き込み
void writeI2c(int slave_addr, byte register_addr, byte value) {
  Wire.beginTransmission(slave_addr);
  Wire.write(register_addr);
  Wire.write(value);
  Wire.endTransmission();
}

// I2Cへの読み込み
void readI2c(int slave_addr,byte register_addr, int num, byte *buf) {

  Wire.beginTransmission(slave_addr);
  Wire.write(register_addr);

  Wire.endTransmission();
  Wire.beginTransmission(slave_addr);
  Wire.requestFrom(slave_addr, num);

  int i = 0;
  while (Wire.available())
  {
    byte n = 0x00;
    n = Wire.read();
    *(buf + i) = n;

    i++;
  }
  Wire.endTransmission();
}
for Raspberry Pi
I2Cコネクタに接続した9Axis I2C Brickより3軸加速度、3軸ジャイロ、3軸コンパス情報を取得し、コンソールに出力します。
# coding: utf-8
#
# FaBo Brick Sample
#
# #202 9AXIS I2C Brick
#

import smbus
import time

ADDRESS = 0x68
CHANNEL = 1

WHO_AM_I = 0x75
PWR_MGMT_1 = 0x6B
INT_PIN_CFG = 0x37
ACCEL_OUT = 0x3B
TEMP_OUT = 0x41
GYRO_OUT = 0x43
MAGNETO_ADDR = 0x0C
MAGNETO_CNTL1 = 0x0A
MAGNETO_CNTL1_MODE = 0x02
MAGNETO_OUT = 0x03

bus = smbus.SMBus(CHANNEL)


class MPU9250:
    def __init__(self, address):
        self.address = address

        data = bus.read_i2c_block_data(self.address, WHO_AM_I, 1)
#        print '%x' % data[0]
        if data[0] == 113:
            bus.write_byte_data(self.address, PWR_MGMT_1, 0x00)
            bus.write_byte_data(self.address, INT_PIN_CFG, 0x02)
            bus.write_byte_data(MAGNETO_ADDR, MAGNETO_CNTL1, MAGNETO_CNTL1_MODE)

    def read_accel(self):
        data = bus.read_i2c_block_data(self.address, ACCEL_OUT, 6)

        x = data[0] | (data[1] << 8)
        if(x & (1 << 16 - 1)):
            x = x - (1<<16)

        y = data[2] | (data[3] << 8)
        if(y & (1 << 16 - 1)):
            y = y - (1<<16)

        z = data[4] | (data[5] << 8)
        if(z & (1 << 16 - 1)):
            z = z - (1<<16)

        return {"x": x, "y": y, "z": z}

    def read_gyro(self):
        data = bus.read_i2c_block_data(self.address, GYRO_OUT, 6)

        x = data[0] | (data[1] << 8)
        if(x & (1 << 16 - 1)):
            x = x - (1<<16)

        y = data[2] | (data[3] << 8)
        if(y & (1 << 16 - 1)):
            y = y - (1<<16)

        z = data[4] | (data[5] << 8)
        if(z & (1 << 16 - 1)):
            z = z - (1<<16)

        return {"x": x, "y": y, "z": z}

    def read_mag(self):
        data = bus.read_i2c_block_data(MAGNETO_ADDR, MAGNETO_OUT, 7)

        x = data[0] | (data[1] << 8)
        if(x & (1 << 16 - 1)):
            x = x - (1<<16)

        y = data[2] | (data[3] << 8)
        if(y & (1 << 16 - 1)):
            y = y - (1<<16)

        z = data[4] | (data[5] << 8)
        if(z & (1 << 16 - 1)):
            z = z - (1<<16)

        return {"x": x, "y": y, "z": z}

if __name__ == "__main__":
    mpu9250 = MPU9250(ADDRESS)

    while True:
        accel = mpu9250.read_accel()
        print " ax = " , ( accel['x'] )
        print " ay = " , ( accel['y'] )
        print " az = " , ( accel['z'] )
        gyro = mpu9250.read_gyro()
        print " gx = " , ( gyro['x'] )
        print " gy = " , ( gyro['y'] )
        print " gz = " , ( gyro['z'] )
        mag = mpu9250.read_mag()
        print " mx = " , ( mag['x'] )
        print " my = " , ( mag['y'] )
        print " mz = " , ( mag['z'] )
        print
        time.sleep(1)
Parts
- InvenSense MPU-9250