#302 Bluetooth Serial Brick

Overview
Bluetooth通信ができるBrickです。
PCやスマートフォンなどの端末とシリアル通信することができます。
Connecting
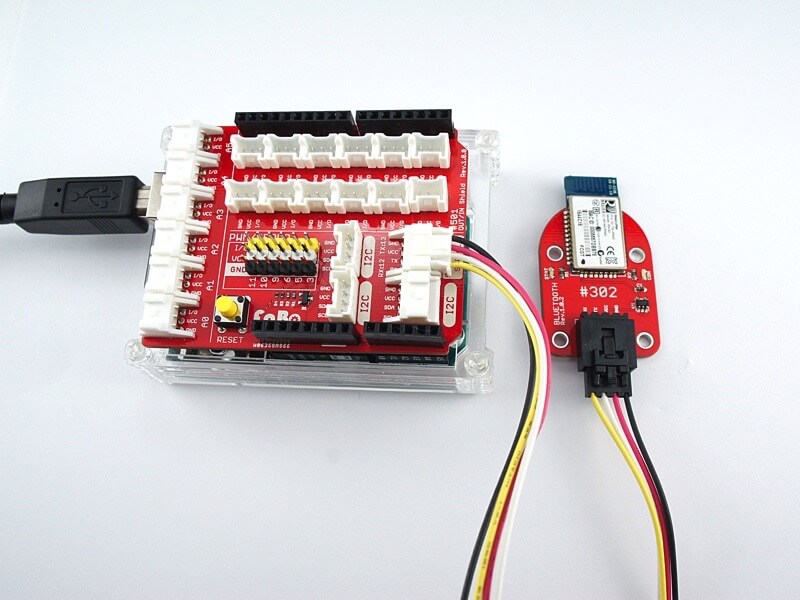
Serialコネクタへ接続します。

Support
| Arduino | RaspberryPI | IchigoJam |
|---|---|---|
| ◯ | ◯ | ◯ |
RN-42 Datasheet
| Document |
|---|
| RN-42 Datasheet |
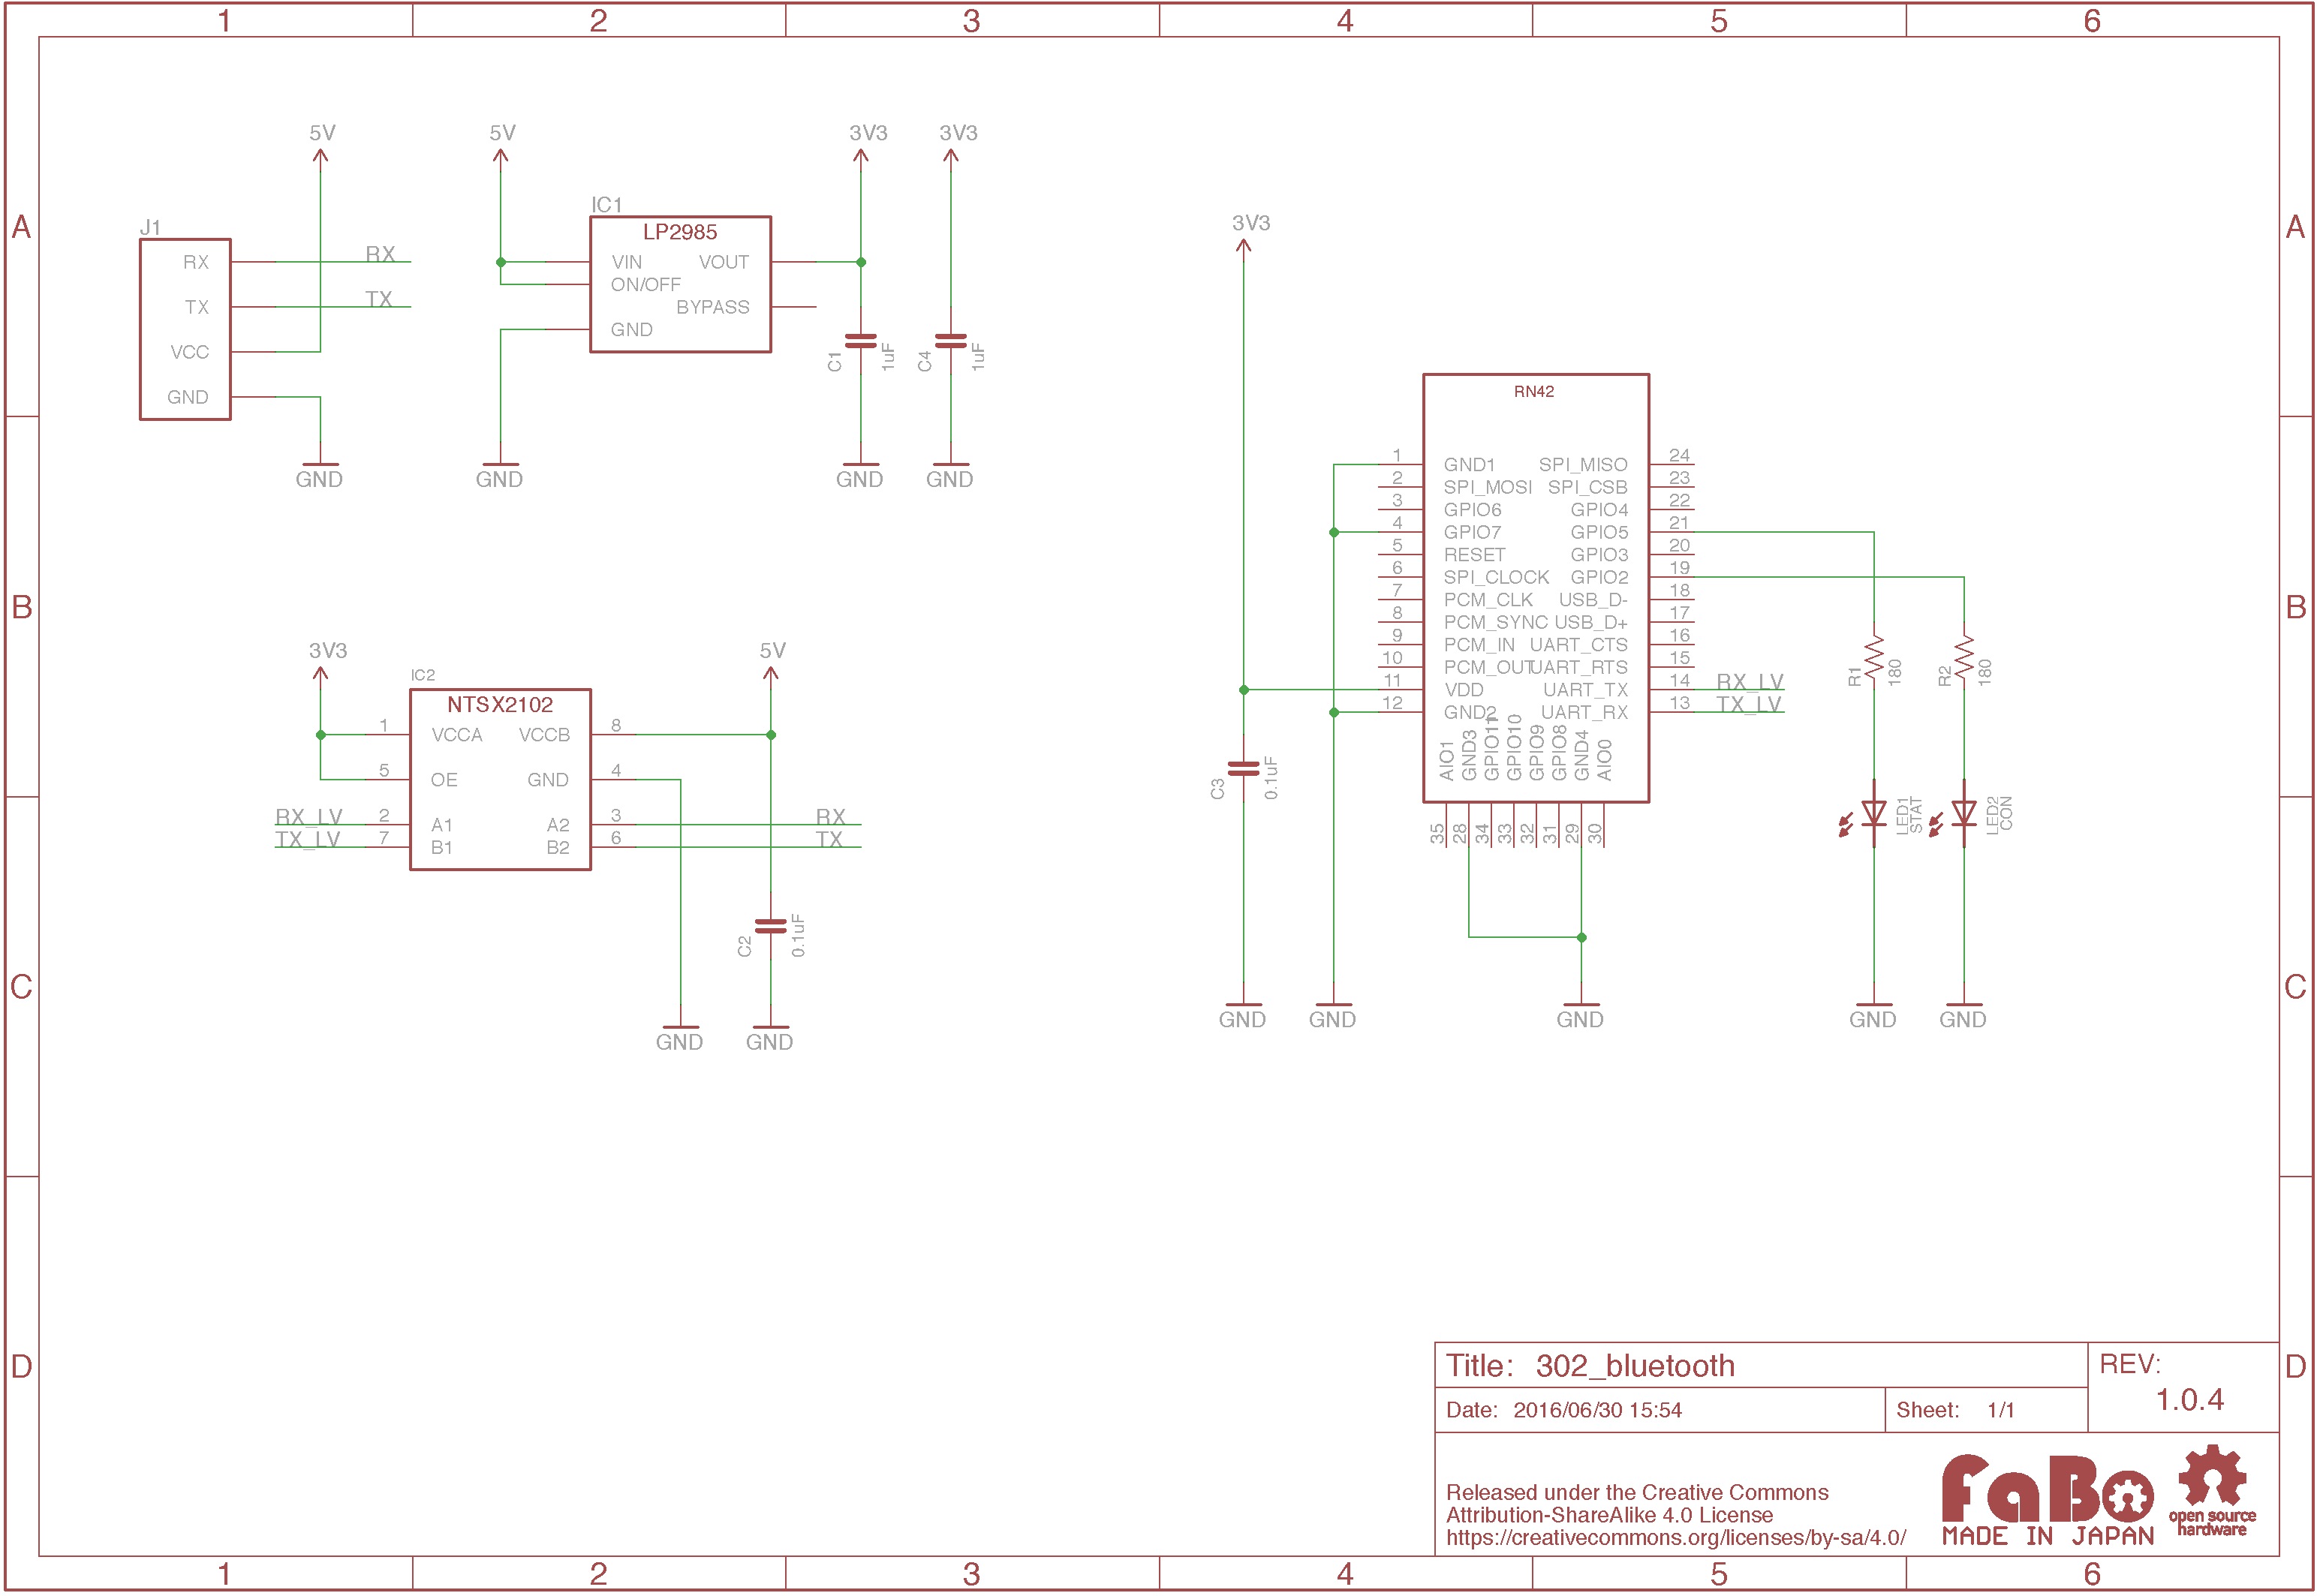
Schematic

Sample Code
for Arduino
SerialコネクタにBluetooth Brickを接続し、他の端末と無線通信します。 シリアルモニタの入力欄に文字を入力し確定することで、Bluetooth接続を行っている端末に文字を送信することができます。
//
// FaBo Brick Sample
//
// brick_serial_bluetooth
//
#include <SoftwareSerial.h>

int bluetoothRx = 12;  // RX-I pin of bluetooth mate, Arduino D12
int bluetoothTx = 13;  // TX-O pin of bluetooth mate, Arduino D13

SoftwareSerial mySerial(bluetoothRx, bluetoothTx); // RX, TX

void setup()
{
  // Open serial communications and wait for port to open:
  Serial.begin(57600);
  while (!Serial) {
    ; // wait for serial port to connect. Needed for Leonardo only
  }

  Serial.println("Goodnight moon!");

  // set the data rate for the SoftwareSerial port
  mySerial.begin(115200);
}
int c = 0;
void loop() // run over and over
{
  if (mySerial.available()){
    char c = mySerial.read();
    Serial.write(c);

  }
  if (Serial.available())
    mySerial.write(Serial.read());
}
for RaspberryPI
SerialコネクタにBluetooth Brickを接続し、他の端末と無線通信します。 コンソール上で文字を入力し確定することで、Bluetooth接続を行っている端末に文字を送信することができます。
# coding: utf-8
#
# FaBo Brick Sample
#
# brick_serial_usb
#

import serial
import time

BLUETOOTH = '/dev/ttyAMA0'
RATE = 115200

if __name__ == '__main__':

    count = 0
    myserial=serial.Serial(BLUETOOTH, RATE, timeout=1)

    while True:
        count += 1
        myserial.write("send:%d" %count)
        str=myserial.readline()
        print (str)
Macでのシリアル通信確認
Arduino(またはRaspberryPI)にBluetoothを接続した状態でPCと接続
Macのメニューよりシステム環境設定を開き、「Bluetooth」を選択
対象のBluetoothモジュールを選択し、ペアリングを行う
ターミナルを起動し、下記のコマンドを実行して接続先の確認
※「/dev/tty.RNBT」で始まるものがBrickになります。sudo ls /dev/tty.*- ターミナルにて下記のコマンドを実行し、Screenを起動
※「XXXXX」の箇所は上記で確認したものを設定します。
sudo screen /dev/tty.XXXXX 115200
※ペアリングを行った後にしばらく時間が経過してしまうと、ここで接続できない場合があります。
接続できない場合はBluetoothの環境設定から接続情報を削除し、再度Bluetoothのペアリングを行って下さい。
Arduinoを起動し、シリアルモニタを開く
シリアルモニタより文字を入力してEnterキーを押下、またはScreenの画面からキーを入力により文字が送信できることを確認
終了する場合、[Ctrl+A]->[Ctrl+¥]->[Y]の順にキーを押す
Arduino <-> Androidのシリアル通信
MainActivity.java
package helloandroid.gclue.com.hellobt;

import android.Manifest;
import android.app.Activity;
import android.bluetooth.BluetoothAdapter;
import android.bluetooth.BluetoothDevice;
import android.bluetooth.BluetoothSocket;
import android.os.Bundle;
import android.os.Handler;
import android.os.Message;
import android.util.Log;
import android.view.Menu;
import android.view.MenuItem;
import android.view.View;
import android.widget.Button;
import android.widget.TextView;

import java.io.IOException;
import java.io.InputStream;
import java.io.OutputStream;
import java.util.Set;
import java.util.UUID;

public class MainActivity extends Activity implements Runnable, View.OnClickListener {
    /** tag. */
    private static final String TAG = "BluetoothSample";

    /** Bluetooth Adapter.  */
    private BluetoothAdapter mAdapter;

    /** Bluetoothデバイス. */
    private BluetoothDevice mDevice;

    /** Bluetooth UUID. */
    private final UUID MY_UUID = UUID.fromString("00001101-0000-1000-8000-00805F9B34FB");

    /** デバイス名. */
    private final String DEVICE_NAME = "RNBT-5E7F";

    /** Soket. */
    private BluetoothSocket mSocket;

    /** Thread. */
    private Thread mThread;

    /** Threadの状態を表す. */
    private boolean isRunning;

    /** 接続ボタン. */
    private Button connectButton;

    /** 書込みボタン. */
    private Button writeButton;

    /** ステータス. */
    private TextView mStatusTextView;

    /** Bluetoothから受信した値. */
    private TextView mInputTextView;

    /** Action(ステータス表示). */
    private static final int VIEW_STATUS = 0;

    /** Action(取得文字列). */
    private static final int VIEW_INPUT = 1;

    /** Connect確認用フラグ */
    private boolean connectFlg = false;

    /** BluetoothのOutputStream. */
    OutputStream mmOutputStream = null;

    @Override
    protected void onCreate(Bundle savedInstanceState) {
        super.onCreate(savedInstanceState);
        setContentView(R.layout.activity_main);

        mInputTextView = (TextView)findViewById(R.id.inputValue);
        mStatusTextView = (TextView)findViewById(R.id.statusValue);

        connectButton = (Button)findViewById(R.id.connectButton);
        writeButton = (Button)findViewById(R.id.writeButton);

        connectButton.setOnClickListener(this);
        writeButton.setOnClickListener(this);

        // Bluetoothのデバイス名を取得
        // デバイス名は、RNBT-XXXXになるため、
        // DVICE_NAMEでデバイス名を定義
        mAdapter = BluetoothAdapter.getDefaultAdapter();
        mStatusTextView.setText("SearchDevice");
        Set< BluetoothDevice > devices = mAdapter.getBondedDevices();
        for ( BluetoothDevice device : devices){
            if(device.getName().equals(DEVICE_NAME)){
                mStatusTextView.setText("find: " + device.getName());
                mDevice = device;
            }
        }
    }

    @Override
    protected void onPause(){
        super.onPause();

        isRunning = false;
        try{
            mSocket.close();
        }
        catch(Exception e){}
    }

    @Override
    public void run() {
        InputStream mmInStream = null;

        Message valueMsg = new Message();
        valueMsg.what = VIEW_STATUS;
        valueMsg.obj = "connecting...";
        mHandler.sendMessage(valueMsg);

        try{

            // 取得したデバイス名を使ってBluetoothでSocket接続
            mSocket = mDevice.createRfcommSocketToServiceRecord(MY_UUID);
            mSocket.connect();
            mmInStream = mSocket.getInputStream();
            mmOutputStream = mSocket.getOutputStream();

            // InputStreamのバッファを格納
            byte[] buffer = new byte[1024];

            // 取得したバッファのサイズを格納
            int bytes;
            valueMsg = new Message();
            valueMsg.what = VIEW_STATUS;
            valueMsg.obj = "connected.";
            mHandler.sendMessage(valueMsg);

            connectFlg = true;

            while(isRunning){


                // InputStreamの読み込み
                bytes = mmInStream.read(buffer);
                Log.i(TAG, "bytes=" + bytes);
                // String型に変換
                String readMsg = new String(buffer, 0, bytes);

                // null以外なら表示
                if(readMsg.trim() != null && !readMsg.trim().equals("")){
                    Log.i(TAG,"value="+readMsg.trim());

                    valueMsg = new Message();
                    valueMsg.what = VIEW_INPUT;
                    valueMsg.obj = readMsg;
                    mHandler.sendMessage(valueMsg);
                }
                else{
                    // Log.i(TAG,"value=nodata");
                }

            }
        }catch(Exception e){

            valueMsg = new Message();
            valueMsg.what = VIEW_STATUS;
            valueMsg.obj = "Error1:" + e;
            mHandler.sendMessage(valueMsg);

            try{
                mSocket.close();
            }catch(Exception ee){}
            isRunning = false;
            connectFlg = false;
        }
    }

    @Override
    public void onClick(View v) {
        if(v.equals(connectButton)) {
            // 接続されていない場合のみ
            if (!connectFlg) {
                mStatusTextView.setText("try connect");

                mThread = new Thread(this);
                // Threadを起動し、Bluetooth接続
                isRunning = true;
                mThread.start();
            }
        } else if(v.equals(writeButton)) {
            // 接続中のみ書込みを行う
            if (connectFlg) {
                try {
                    mmOutputStream.write("2".getBytes());
                    mStatusTextView.setText("Write:");
                } catch (IOException e) {
                    Message valueMsg = new Message();
                    valueMsg.what = VIEW_STATUS;
                    valueMsg.obj = "Error3:" + e;
                    mHandler.sendMessage(valueMsg);
                }
            } else {
                mStatusTextView.setText("Please push the connect button");
            }
        }
    }

    /**
     * 描画処理はHandlerでおこなう
     */
    Handler mHandler = new Handler() {
        @Override
        public void handleMessage(Message msg) {
            int action = msg.what;
            String msgStr = (String)msg.obj;
            if(action == VIEW_INPUT){
                mInputTextView.setText(msgStr);
            }
            else if(action == VIEW_STATUS){
                mStatusTextView.setText(msgStr);
            }
        }
    };

    @Override
    public boolean onCreateOptionsMenu(Menu menu) {
        // Inflate the menu; this adds items to the action bar if it is present.
        getMenuInflater().inflate(R.menu.menu_main, menu);
        return true;
    }

    @Override
    public boolean onOptionsItemSelected(MenuItem item) {
        // Handle action bar item clicks here. The action bar will
        // automatically handle clicks on the Home/Up button, so long
        // as you specify a parent activity in AndroidManifest.xml.
        int id = item.getItemId();

        //noinspection SimplifiableIfStatement
        if (id == R.id.action_settings) {
            return true;
        }

        return super.onOptionsItemSelected(item);
    }
}
activity_main.xml
<?xml version="1.0" encoding="utf-8"?>
<LinearLayout xmlns:android="http://schemas.android.com/apk/res/android"
    android:layout_width="fill_parent"
    android:layout_height="fill_parent"
    android:orientation="vertical" >

    <Button android:id="@+id/connectButton"
        android:layout_width="fill_parent"
        android:layout_height="wrap_content"
        android:text="Connect" />

    <TextView
        android:id="@+id/statusValue"
        android:layout_width="fill_parent"
        android:layout_height="wrap_content"
        />

    <TextView
        android:id="@+id/inputValue"
        android:layout_width="fill_parent"
        android:layout_height="wrap_content"
        />

    <Button android:id="@+id/writeButton"
        android:layout_width="fill_parent"
        android:layout_height="wrap_content"
        android:text="Write" />

</LinearLayout>
AndroidManifest.xml
<?xml version="1.0" encoding="utf-8"?>
<manifest xmlns:android="http://schemas.android.com/apk/res/android"
    package="helloandroid.gclue.com.hellobt" >

    <uses-permission android:name="android.permission.BLUETOOTH" />
    <uses-permission android:name="android.permission.BLUETOOTH_ADMIN" />

    <application
        android:allowBackup="true"
        android:icon="@mipmap/ic_launcher"
        android:label="@string/app_name"
        android:theme="@style/AppTheme" >


        <activity
            android:name=".MainActivity"
            android:label="@string/app_name" >
            <intent-filter>
                <action android:name="android.intent.action.MAIN" />

                <category android:name="android.intent.category.LAUNCHER" />
            </intent-filter>
        </activity>
    </application>

</manifest>
Github
- Arduino https://github.com/FaBoPlatform/FaBo/blob/master/brick_serial_bluetooth/Arduino/brick_serial_bluetooth_RN42/brick_serial_bluetooth_RN42.ino
- Android https://github.com/FaBoPlatform/FaBo/tree/master/brick_serial_bluetooth/Android/Example2/HelloBT
Parts
- Bluetooth Module IC